


Some of some know what VPN is but for those who don’t know
let me explain. VPN (Virtual Private Network) this is a technology that allows
a computer using a public internet connection join a private network by way of
a secure “tunnel” between that machine and the network.

Step 7 If you can't connect, the problem could be
due to the server configuration. (There are different types of VPN.)
Check with your network administrator to see what kind is in use--such
as PPTP--then, on the Connect VPN Connection screen, select Properties.
Step 8 Navigate to the Security tab and select the specific Type of VPN from the drop-down list. You may also have to unselect Include Windows logon domain under the Options tab. Then click OK and Connect.
Step 2 Click Change Adapter Settings in the left-hand menu.
Step 3 Click File, and then New Incoming Connection.
Step 4 Select the users you'd like to give access to and click Next.
Step 5 Click Through the Internet and select Next.
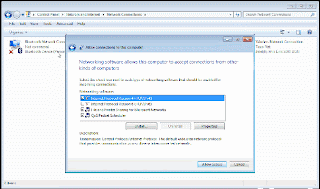
Step 6 Select the Internet Protocol you'd like to use. (The default TCP/IPv4--the line highlighted in the screenshot below--will work fine.)
 Step 7 Finally, click Allow access; you've now set up an incoming VPN connection.
This are two ways known on how to setup a VPN for windows 7
Any question please comment below and for more update like our page, follow on twitter and also subscribe to get updates directly to your email. Subscribe below!!!
Need something Else search below!!
The most common ways of configuring a VPN is in two ways, The
first and more-common scenario, called outgoing, is
setting up a remote computer to call into the office network. The second
scenario, called incoming, occurs
on the network side, where a computer allows secure connections from other
computers. Windows 7 comes preloaded with the Agile VPN client, which makes
setting up either kind of connection relatively easy.
Step by Step: Connecting to a VPN (Outgoing)
Step 1 Click the Start button. In the search bar, type VPN
and then select Set up a virtual private network (VPN) connection.
Step 2 Enter the IP address or domain name of the server to which
you want to connect. If you're connecting to a work network, your IT
administrator can provide the best address.
Step 3 If you want to set up the connection, but not connect,
select Don't connect now; otherwise, leave it blank and click Next.
Step 4 On this next screen, you can either put in your username
and password, or leave it blank. You'll be prompted for it again on the actual
connection. Click Connect.
Step 5 To connect, click on the Windows network logo on the
lower-right part of your screen; then select Connect under VPN
Connection.
Step 6 In the Connect VPN Connection box, enter the appropriate
domain and your log-in credentials; then click Connect.

Step 8 Navigate to the Security tab and select the specific Type of VPN from the drop-down list. You may also have to unselect Include Windows logon domain under the Options tab. Then click OK and Connect.
Step by Step: Building a VPN (Incoming)
Step 1 Click the Start button, and, in the search bar, type Network and Sharing.Step 2 Click Change Adapter Settings in the left-hand menu.
Step 3 Click File, and then New Incoming Connection.
Step 4 Select the users you'd like to give access to and click Next.
Step 5 Click Through the Internet and select Next.
Step 6 Select the Internet Protocol you'd like to use. (The default TCP/IPv4--the line highlighted in the screenshot below--will work fine.)

This are two ways known on how to setup a VPN for windows 7
Any question please comment below and for more update like our page, follow on twitter and also subscribe to get updates directly to your email. Subscribe below!!!
Need something Else search below!!
0 comments:
Post a Comment
I will Love to hear your comments